Netgear wireless router is one of the most popular wireless networking devices allows you to interconnect your computers, laptops, peripheral devices, and non-computer devices etc. Wireless routers is designed to allow wire-free Internet connectivity for multiple computers for home or business network within a selected area. If you want to set it up for DSL connection to access internet wirelessly? However, it can be utterly difficult and time consuming to setup the router device on your own without pre cise instructions. Don’t worry. Here is your comprehensive support guide that will help you setup your Netgear wireless router device for DSL internet connection.
 cise instructions. Don’t worry. Here is your comprehensive support guide that will help you setup your Netgear wireless router device for DSL internet connection.
Instructions:
1. First switch off all the devices and remove all the cables.
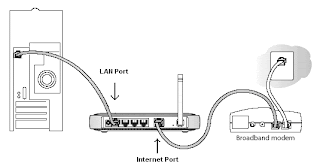
2. Connect the Modem to the Internet port of the NETGEAR router and the computer to any of the four LAN ports as shown in the diagram.
3. When powered on, the router will detect the modem itself.
4. Now open up the browser window and in the address bar, type http://192.168.1.1 or http://192.168.0.1 and press enter.
5. When the window pops up asking your login information, type in the default username and password that must have come with the router documentation. Generally, most of the routers come with ‘admin’ (as the default username) and ‘password’ as the default password.
6. Click Setup Wizard on the top left corner, Select Yes for the Setup Wizard to detect the type of internet connection and click Next..
7. The Setup Wizard will detect the type of Internet connection. DSL connections which require a login to connect to the internet will be detected as PPPoE. Click Next
8. The next window will ask your username/password, key in the information given by your ISP, and click on ‘Apply’.
9. The router will then save all the settings, follow rest of the instructions and connect to the internet.
No comments:
Post a Comment